Sunday, March 31, 2013

Pretty Serious Seriously Randoms: The Pink One & Martian Sea

The Seriously Random collection by Pretty Serious all began when Kaz and Ben decided to post a few bottle shots of early versions of some of the polishes in their lineup. They received an overwhelmingly positive response to some of them, so after some more testing, they released two of them as a 'misfits' collection - the Seriously Randoms. (It's also a cute little play on the name of Kaz's blog, Pretty Random.)

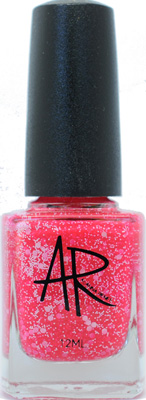
The Pink One is a bright neon pink with blue shimmer. I'm not convinced that it works with my skintone, but it's so eye-searingly bright that I can't help but love it. It's highly pigmented so it only needs 2 thin coats for full coverage, but I used 3 in this swatch because I have freakishly visible nail lines. It also dries really quickly and oh so smooth. I debated for a while whether or not to put top coat over it, and in the end I did but it really didn't make a difference.

Apologies for the underexposed photos. This polish is so bright even my fancy SLR camera couldn't handle the colours!

Sun
Sun
Lightbox
Lightbox
In the words of my boyfriend "It hurts my retinas!"

To be honest, when I first saw Martian Sea in the bottle I wasn't sure if I would like it. The brown base is shifts colour slightly, and in some lights looks like a rich milk chocolate brown, but in others more like a dirty, rusty, brick colour. Kind of like the exact colour of Martian mud (or at least, how I would imagine it to look). This latter colour didn't appeal to me at all, but on the nail it actually looked quite nice due to the colour shifting gold-green-blue shimmer.

This only needed 2 coats for full opacity, and once again dried super smooth and shiny. I actually couldn't get the lid of my top coat open when I did this swatch, so these photos are all without top coat.

Sun
Shade
Lightbox
Lightbox
Isn't that shimmer in the bottle pretty?

The Seriously Randoms are now available for $9.95 on the Pretty Serious website. In fact, they're having a 20% off sale this easter long weekend, get in there!
Saturday, March 30, 2013

Alanna Renee Magical World Collection Preview

If you have any interest in indie nail polish at all, no doubt you've heard about Alanna Renee. This Aussie indie brand burst onto the scene in January this year, and is the baby of Alanna from Pretty Purple Polish. I've reviewed a couple of the polishes from her debut collection here.

Alanna's been dropping a few hints and sneak peeks over the last week or so of her new Magical World collection, based on - you guessed it - Harry Potter! Apart from nail polish and Pokemon, Harry Potter is my other massive obsession. So words cannot describe how excited I am to share this preview with you!


HEDWIG is a white, yellow, brown and black glitter in a white base.


PATRONUS is a silvery white shimmer with blue flecks.


DRAUGHT OF PEACE is a turquoise creme with silver glitter.


CHOCOLATE FROG is a blue jelly with gold and brown glitter.


AVADA KEDAVRA is a bright green jelly with white glitter.


DRINK OF DESPAIR is an emerald green glitter in a green jelly base.


HORCRUX is a black creme with green flakes that shift to red and blue.


DEMENTOR is a black creme with silver glitter.


FAWKES is a red and gold glitter in a red base.


STUPEFY is a bright red jelly with white glitter.


BUTTERBEER is an orange creme with white glitter.


GOLDEN SNITCH is a gold and silver glitter in a clear base.


The Magical World collection will be available on 1st April from www.alannarenee.com, at $7.99 each. 

Disney Princess Challenge: Mulan

This week's theme for the Disney Princess Challenge is Mulan. I had to rewatch Mulan last night to find inspiration for this theme, and it reminded me of what a great movie this is, especially in comparison to Aladdin! Mulan is the only Disney princess who doesn't hang around waiting for a prince to save her, and all of her actions in the entire movie are done out of love for her family and wanting to prove herself, rather than chasing some man. Disney princesses are widely trashed as terrible role models for young girls, but I think Mulan is an excellent one.

This mani is inspired by the painted clouds in the opening title sequence of the film.

Image Source: Jim Hill Media
 I will start off by saying that this was a fail on pretty much all levels. I started with a base of China Glaze FYI, a neutral tan with a holographic finish. That was the closest colour to parchment that I own, as I'm not really a neutrals person. To try to emulate the watercolour look, I mixed a couple of drops of black polish with some thinner. This actually worked pretty well, but I don't think I added enough black and the end result was very faint on the nail. So I tried to go over some of the lines, which just looked terrible, and then the entire thing smudged when I applied a matte top coat.


Sorry Mulan, I couldn't do you justice! I might have to try again sometime.


Check out the other girls who are taking part in the Disney Princess Challenge: 
Wednesday, March 27, 2013

Guest Post on Ten Little Nubs

Today I'm guest posting over at my friend Elissa's new blog, Ten Little Nubs. You might know her from her previous blog name, Lissa's Polish Addiction, and her perfectly painted nubbins! I'm thrilled that she's asked me to do a guest post for her as part of the relaunch of her revamped blog.

Here is a sneak peak of what's in my post:


Do you recognise what the theme is? Stop guessing (or even if you do recognise it) and check out my post on Ten Little Nubs!

Work Friendly Wednesday - Rescue Beauty Lounge Insouciant

Hey everyone! I've decided to start a new post series - Work Friendly Wednesdays. I've just started my new job in a semi-corporate environment so my usual fare of glitter, bright colours and nail art aren't exactly appropriate. Since this job is part time Wednesday - Friday, every Wednesday I'll be showing you the polish I'll be wearing to work that week. Since a lot of people also have jobs that restrict the types of polish you can wear, I hope you will find these posts interesting and useful!


To kick things off, I am wearing Rescue Beauty Lounge Insouciant. This is a greyed out purple based taupe with a very subtle blue shimmer. A common complaint I've heard about RBLs are that the shimmers are evident in the bottle, but barely visible on the nail. Unfortunately, this is true for this polish. I can't see the blue shimmer in normal indoor lighting, but it definitely has a softness that sets it apart from a standard creme finish. The shimmer does show up a little bit in the sun though.

This only needed 2 thin coats, and dried faster than most polishes I'm used to. Perfect for slapping on quickly the night before work.

Lightbox
Sun
Sun
I tried it with a matte top coat it but it looked awful. I think I've finally broken my mattifying obsession!

Rescue Beauty Lounge polishes are available from the RBL website for $20 each. Insouciant is actually limited edition so I'd recommend getting it quick! Shipping is free for international orders over $200.
Tuesday, March 26, 2013

10 Things I Wish I Knew When I Started Painting My Nails

I was going to call this post "10 Tips for Nail Newbies" but I realised that all of these tips apply to anyone who wears nail polish, whether they're new or more experienced. So instead, here are the top 10 things I wish I knew when I started painting my nails:

1. Pure Acetone

You wouldn't normally think that an industrial strength paint stripper is good to use on your skin and nails... But trust me when I say that this will become your new best friend. Pure acetone is so much more effective at removing nail polish (especially glitter), and it makes cleanup a breeze. It's also far cheaper than regular nail polish remover, especially considering the massive amounts that we go through. Find it at your local Bunnings, and don't be afraid to buy a large 4L can and decant into a smaller bottle.

2. Pure Acetone + Glycerin
Image Source: Labmuffin
So you're using acetone, and you've noticed it's incredibly drying. Your cuticles look disgusting, flaky and white, and you're going through tubs of hand cream to combat it. Now is the time to take your nail polish remover switcheroo one step further and add some glycerin to it. It's gentler on your skin, and as you can see in the comparison picture above, doesn't destroy your cuticles. See Labmuffin's recipe on how to mix up your own holy grail nail polish remover.

Click "Read more" to see the rest!
Monday, March 25, 2013

Aussie Nails Monday: Blue & March Nail Art Challenge: Sparkles

This week's Aussie Nails Monday theme is Blue. Blue is my favourite (nail polish) colour so I was spoilt for choice with this theme! However, I wasn't spoilt for time, so I had to choose a quick and simple design. Today's March Nail Art Challenge theme just happens to be Sparkles, so what better way to combine the two than with a glitter gradient?

I used Essie Bikini So Teeny and Nails Inc Upper Brook Street as the undies. The glitter is Nails Inc Royal Arcade. The blue is pretty similar to Ulta3 New Years Eve, but it has a lot more different sizes, and it's extremely dense. I actually had trouble spreading it out enough to make a gradient!

Side note: How awesome is that crystal cap on Upper Brook Street??


And of course I had to mattify it. I love the look of glitter under a matte top coat.


Here are the other girls participating in Aussie Nails Monday:


Sunday, March 24, 2013

Disney Princess Challenge: Snow White

This week's theme for the Disney Princess Challenge is Snow White. I was never really into Snow White unfortunately... And I struggled to be really inspired for this theme, so my attempt is a bit half-hearted. On the other hand I've been wanting to try this style of dotting for ages so this was the perfect opportunity.

I used Pretty Serious BSOD, OPI Red and Rimmel Lemon Drop. I'm still obsessed with the OPI Matte Top Coat so I couldn't resist mattifying this. I love the smooth look!


Check out the other girls who are taking part in the Disney Princess Challenge: 
Tuesday, March 19, 2013

Louboutin Nails with OPI Matte Top Coat

Today's nails are very simple, but classic. They're inspired by my Louboutins. I bought myself a pair of Very Prive 120s as a graduation present at the end of last year. I paid full Australian RRP because the classic styles are really hard to find overseas online, but I am so happy with them. I know it's hard to justify paying that much for a shoe just because it's a certain brand, but a) I'm a label whore and b) they're comfy (for 12cm heels), well-made and look freaking amazing.

I was also lucky enough to get my hands on a bottle of OPI's new Matte Top Coat for this mani. I've been dying to try a matte top coat for ages, but I never got around to actually buying Essie Matte About You, the one with the best reviews so far. Now that I've tried the OPI one I don't think I'll need to try any other brands. It dries in seconds and it has a really flat, matte finish. I know the matte look has been around for a while now but I love it. I don't know if I'll ever get sick of it!


A few tips for applying matte top coat that I've discovered while doing this mani:
  • The thing about matte top coats is that they show every imperfection in the nail, as you can see in the photos above. Next time I'll buff my nails and use a ridge-filling base coat. 
  • Matte top coats aren't as forgiving in terms of self-levelling as Seche Vite, so make sure you apply a nice thick coat. I found that it dried just as quickly as a thin coat, but without any patchiness.
  • I used two thick coats for this mani. I think it gives a smoother finish. I waited for the first coat to dry before applying the second.
  • It might even be worth trying the matte top coat over Seche Vite, after it has completely dried. This might help to get a smooth finish. I'll try it and update this post with the results.

Are you a fan of matte nails?
Monday, March 18, 2013

Aussie Nails Monday: Ombre & Lotsatuplet Nails

Good morning! Today's Aussie Nails Monday theme is Ombre. After doing my Bestie Twin Nails with Labmuffin, a bunch of us decided to do mass matching nails. We call them "Lotsatuplet Nails"!

It was tricky to figure out how we were going to co-ordinate a theme amongst so many of us, so we decided to go with bouncing ombre dots as an overall theme (as most of us were doing Aussie Nails Monday anyway), and then we'd pair up to match colours on contrasting undies. I chose blue, and my colour twin was Bec from Nail Gun XS. Aren't her nails just perfect??


This was actually really time consuming to do, especially with the ombre dots going in the opposite direction on the accent nail. I used Ulta3 Spring Shower and China Glaze Man Hunt, and mixed them together in varying amounts to create all the in between shades. The most time consuming thing was waiting for each row of dots to dry before applying the next shade.

I really like this effect. It reminds me of blue patterned china:
(Source: www.123rf.com)
Here are the other girls participating in Aussie Nails Monday:


Sunday, March 17, 2013

St Patrick's Day

Today's Nail Art March Challenge is St Patrick's Day... Because it's St Patrick's Day today! So I tried these four leaf clover nails using Polish and Panda's handy tutorial. They're really easy, even though you wouldn't be able to tell from the wonkiness of my attempt.

For the clover nails, I started with a base of Ulta3 Corsican Rose. I then painted the clovers with Illamasqua Rampage and painted over them with Pretty Serious Blue Gums on Boxing Day. The accent nail is a base of Rampage with a sponged gradient of Blue Gums and OPI Goldeneye. I can't get over the look of Goldeneye when it's sponged!

Illamasqua Rampage is such a perfect polish. It's a really rich dark rainforest green with a perfect 2 coat formula (like all Illamasqua polishes I've tried). But unfortunately it looks like I won't be buying many more Illamasquas anymore! This one took over 2 months to arrive, after we did a group order way back in January. Several weeks later the fiasco with Royal Mail happened, when they started destroying all nail polish to be sent out of the UK. So we didn't hear from Illamasqua for another few weeks as to the status of our order, and we had no idea what was going on with it. Eventually it just arrived on our doorsteps, and to top it all off the address it came from was an Aussie address! The ridiculous thing is that Illamasqua is made in Australia, and yet they've taken the option to ship to Australia off their website, and the prices are jacked up a ridiculous amount at the counters at Myer. This, combined with their terrible customer service and communication, probably means I will not be purchasing any more of their polishes myself. Which is a real shame because I really like them!


Happy St Patrick's Day! 
Saturday, March 16, 2013

Disney Princess Challenge: Jasmine

I'm taking part in another nail art challenge! I love these challenges because they're fun and motivate me to try new things. Sometimes I have trouble with inspiration so these definitely help. It's also exciting to see the designs the other girls come up with on reveal day!

This one is the Disney Princess Nail Art Challenge, put together by Bec from Lacquer Dreams. As a diehard Disney fan, of course I have to take part in this! There was a lot of debate over who the official Disney Princesses are, and why some are included and some aren't (and why everyone is in a pretty poofy dress except for the ethnic girls!), but this is what we will be doing every Saturday for the next 2 months:

Today's theme is Jasmine from Aladdin. I had a set of Disney towels when I was younger (I may or may not still own said towels...) and Jasmine was my favourite. I think it might have been because I related most to her, with her long black hair - kind of in the same way that I preferred the Lion King 2 over the original because the protagonist was a girl. I have no idea why I didn't relate more to Mulan because she's Chinese. I guess I just liked the romance of owning a pet tiger and riding on a flying carpet with a man who's just stumbled across a huge stash of money, rather than pretending to be a man and fighting Mongolians.

I chose to do a taped chevron inspired by her headband. The blue is Sportsgirl Lagoon. I did the accent nail with one coat of Essie Shine of the Times, and OPI Goldeneye sponged in a gradient over the top. I really love the luxe, antique look of these gold flecks, after doing a similar look here.


Check out the other girls who are taking part in the Disney Princess Challenge: 

Other ways to follow me!

(I pretty much copied and pasted this from Elissa, thanks chick!)

If you read lots of blogs, you may have heard over the last few days that Google Reader is being shut down. I don't use Google Reader so I don't know much about it, other than that it's a way to follow multiple blogs easily. I'm not sure if anyone follows my blog via Google Reader, but if you do then here are a couple of really good alternatives:

My personal recommendation is BlogLovin'. I use this (and the iPhone app) to follow a heap of blogs. It's really easy to use - you just search for any blog name or address, click follow, and it BlogLovin' shows you all the new posts in your feed as they are posted. The best thing is that you can click on the newest one to read it, and a BlogLovin' bar appears at the top of the screen that allows you to just click through to the next unread post in your feed. It also shows how many posts are still unread, so it's really useful!

Click the button below to follow me via BlogLovin':
Follow on Bloglovin

You can also follow the blog via email. There's a box on the right sidebar where you can just put in your email address.

In addition, you can also keep up with me on Instagram (@everylittlepolish). I post stuff there more regularly than I blog, so feel free to follow me and talk to me! I love getting comments from you, it's awesome.

You can also email me (everylittlepolish [at] gmail [dot] com) at any time if you just want to chat, or have any questions for me that you don't want to leave in the comments under a post.

One thing that has been causing a bit of confusion is whether Google Friend Connect is also being discontinued - as far as I'm aware it isn't.

And lastly, a huge thank you to each and every one of you - my followers and readers! I am so thrilled that you take the time to read my blog and appreciate my nail art and swatches. Love and hugs to you all.
Thursday, March 14, 2013

Bestie Twin Nails with Labmuffin

Bestie Twin Nails is a theme that's been fairly popular on Instagram lately. Basically you pair up with your "bestie" and do matching nails. There have been some really inspirational twin nails created, and it looked like  fun, so I paired up with Michelle from Labmuffin to do our own! Luckily we're both control freaks so we tried to co-ordinate as much as possible.

For the dotted gradients, we used a base of Ulta3 Blue Marlin and dots of Ulta3 Lily White and Gold Rush Fever. The glitter gradient is Essence Make It Golden.


I really enjoyed doing these and I think they turned out great! It took a while for us to figure out which polishes we had in common, and then figure out what colour combination and nail art we both liked. Doing this also makes me grateful for the friends I've made and people I've met through nail polish. The Aussie Nails facebook group is one of the friendliest groups of people I've ever met, and I'm so glad to be a part of it.

Ok, end mushy stuff. Check out #bestietwinnails on Instagram to see all the other cool matching manis!

LinkWithin

Related Posts Plugin for WordPress, Blogger...